From the Shop Floor
Practical, hands-on manufacturing notes from the mfgiq engineering team — material behaviour, feeds & speeds reality, and the DFM mistakes we see most.
This page is the stuff we actually talk about at the machines — not a brochure. It's the hard-won practical knowledge our team leans on when we cut metal and plastic day in and day out: how materials really behave, where parts go out of tolerance, and which design decisions quietly drive up cost and scrap. If you're designing a part to be machined, reading this before you finalize the model will save you money and headaches. None of it is proprietary secret sauce — it's established practitioner wisdom, written plainly by people who've ruined enough tools and parts to know better.
— The mfgiq engineering team
Material machinability — how it actually behaves under the cutter
Spec sheets give you tensile strength and hardness. The floor gives you how a material chips, smears, work-hardens, and eats tools. Those are different conversations. Here's how the common ones behave when you actually cut them.
Aluminum — fast and friendly, until it's gummy
Aluminum is the easiest mainstream metal to machine, and it's where a lot of prototype and production work lives. It loves sharp tools and high spindle speed. Run it fast, keep the chip moving, and it cuts clean and bright. Where people get into trouble is treating it like steel: dull tool, low RPM, light timid feed. Do that and aluminum turns gummy — it welds to the cutting edge (built-up edge), the finish goes rough and torn, and the tool effectively gets duller by the second.
The fixes are boring and reliable: sharp, polished, high-rake tooling (often uncoated or with an aluminum-specific coating like ZrN/TiB2 rather than the AlTiN you'd put on steel), generous chip clearance, and either flood coolant or a good air blast plus mist to clear chips out of the cut. Free-machining grades like 6061 behave well; softer, more ductile alloys like 1100 or 5052 are stickier and more prone to that gummy smear. The cast tooling-plate grades (e.g., MIC-6) machine beautifully and stay flat, which is why fixture plates are made from them.
Stainless — keep it moving or it fights back
Stainless steel's defining trait on the floor is work hardening. If you dwell, rub, or let the tool ride without taking a real chip, the surface hardens right in front of you — and then your next pass is cutting hardened material with a tool that's already glazing. The rule we live by: keep feeding, take a real chip, don't dwell, and don't let the tool sit and spin in the cut. A confident, consistent feed beats a timid one every time in stainless.
Not all stainless is equal. 303 is the free-machining one (added sulfur), and it's noticeably more forgiving — it's what you reach for when you just need a stainless part that machines cleanly. 304 is tougher and stringier. 316 (and 316L) is tougher still and gummier — more molybdenum, more corrosion resistance, and more heat at the cutting edge — so expect lower speeds, more coolant, and shorter tool life than 303. If a part doesn't truly need 316's marine/chemical corrosion resistance, specifying it anyway is paying for harder machining you didn't need.
Titanium — slow, flooded, and a real fire risk
Titanium is strong, light, and a genuine pain to machine well. Two physical facts drive everything: it's a poor conductor of heat (the heat stays at the cutting edge instead of leaving in the chip), and it's chemically reactive at temperature. So you run it slow (low SFM), with heavy flood coolant, sharp tooling, and a firm, uninterrupted feed — you want the heat going into the chip and the coolant, not soaking into your tool and the part.
And yes, the fire risk is real: fine titanium chips and dust are flammable and, once lit, burn hot and are hard to put out — water can make a titanium fire worse. That's why shops keep titanium swarf managed and separated, use flood coolant (which also helps keep chips from igniting), and don't let a bird's nest of fine dry chips build up around the tool. Treat it with respect, keep it wet, keep the chips clear.
Tool steels — machine them soft, then harden
The cardinal rule with tool steels (A2, D2, O1, S7, etc.) and other hardenable steels: do your machining in the annealed (soft) state, then send it out for heat treat. Trying to cut hardened tool steel with normal carbide is slow, brutal on tooling, and often just the wrong process (that's hard-milling or grinding/EDM territory). So the workflow is: rough and finish soft, leave a little stock where post-heat-treat dimensions are critical, heat treat to hardness, then grind or hard-finish the few surfaces that actually need to be dead-on. Designing as if you'll machine the final hardness is a common and expensive misunderstanding.
Brass — the one everyone loves
Free-cutting brass, especially C360, is about as good as machining gets. It practically falls apart into clean little chips, finishes bright, holds tolerance easily, and is gentle on tooling. You can run it fast with minimal drama. If a part can be brass and the application allows it, machinists are happy. (Note that lead-free brasses, increasingly required for potable-water and some consumer parts, don't machine quite as sweetly as old leaded C360 — still good, just not magic.)
Plastics — sharp tools and watch the heat
Plastics fail in the opposite direction from metals: instead of work-hardening, they melt, smear, and gum up if you put heat into them. The answer is very sharp tooling, often single-flute or geometry made for plastic, with plenty of chip evacuation so chips carry heat away and don't get re-cut and re-melted in the slot.
Delrin (acetal) machines almost like a soft metal and is a joy — crisp chips, good finish. PEEK is more demanding: it's expensive, sensitive to heat (poor finish and internal stress if it gets hot), and benefits from sharp tools, controlled feeds, and sometimes coolant/air to keep temperature down. Filled plastics (glass- or carbon-filled) are abrasive and wear tools faster than you'd expect. And clamping force matters — plastics deflect, so light, well-supported work-holding keeps thin features from pushing away from the cutter and coming back oversized.
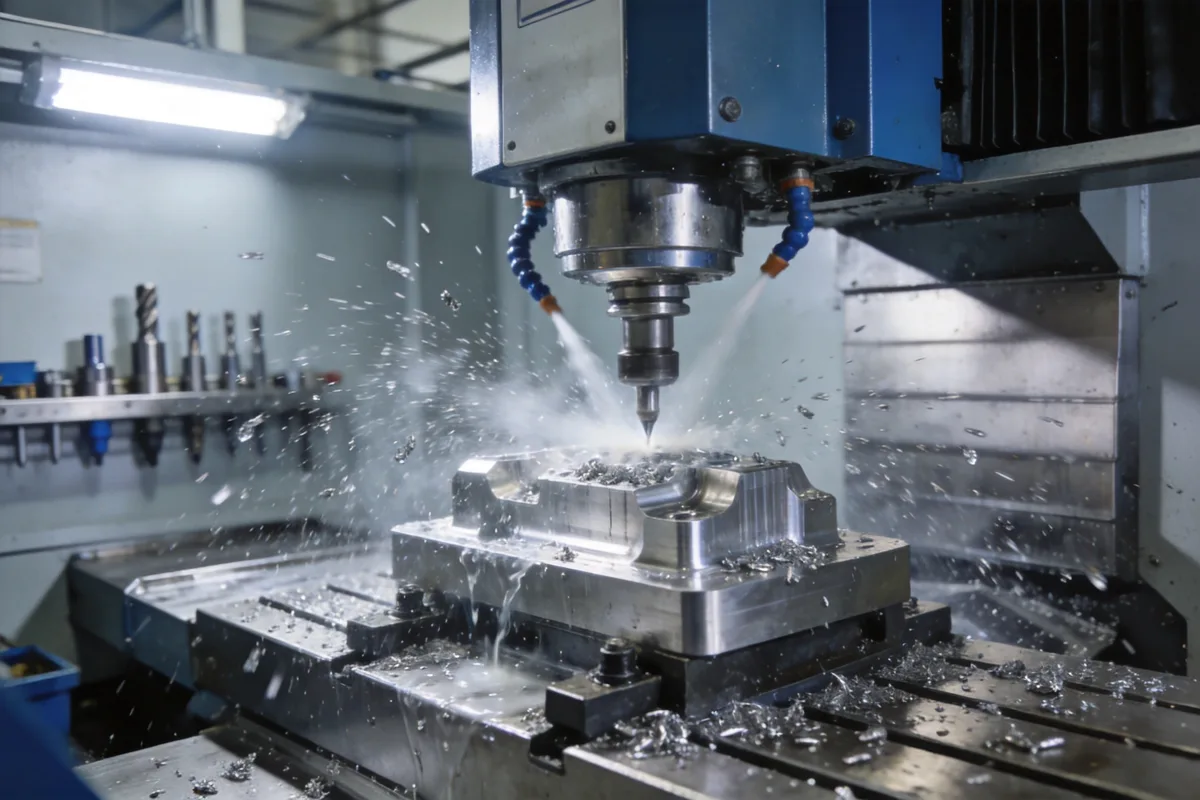
Feeds and speeds — the reality behind the numbers
People want a magic chart. There isn't one. Feeds and speeds are a balance between the material, the tool, the machine's rigidity, how the part is held, and how deep and wide you're cutting. Here's the mental model we actually use.
SFM (surface feet per minute) is how fast the cutting edge is moving through the material — it's a property of the material and tool, not the tool diameter. You pick an SFM the material likes, then convert to RPM for your specific tool diameter (smaller tool = higher RPM for the same SFM). As rough, well-established starting points that vary heavily by tool, coating, and setup: aluminum often runs 600–1000+ SFM, brass similarly high, steels in the 300–500 SFM range, stainless lower, more like 100–300 SFM, and titanium lower still, often well under 150 SFM. Treat those as where to start, not gospel.
Chip load (feed per tooth) is how thick a bite each flute takes. This is the number that actually protects your tool and your finish, and it's the one beginners get most wrong. Too little chip load and the tool rubs instead of cuts — it generates heat, work-hardens stainless, builds up edge on aluminum, and wears out fast. A sharp tool fed at the correct chip load lasts longer and finishes better than the same tool "babied" with a tiny feed. Counterintuitive to a lot of folks, but it's true: rubbing kills tools, cutting doesn't.
Chip thinning is the gotcha that catches people taking light radial cuts. When your radial engagement is less than half the tool diameter (light finishing passes, trochoidal/high-efficiency toolpaths), the actual chip the tool forms is thinner than your programmed feed per tooth — the geometry thins it out. So to keep the real chip in the right range, you have to feed faster on those light cuts. Skip this and you're back to rubbing: light pass, slow feed, glazed tool, poor finish, and people scratching their heads about why the "gentle" pass burned up the cutter.
Climb vs. conventional. On modern, rigid CNC machines with no backlash, climb milling is generally the default — the chip starts thick and thins to zero, which puts less heat into the part, gives better finish, and extends tool life. Conventional milling (chip starts thin, ends thick) tends to rub at entry and can work-harden the surface, but it has its place: on old machines with backlash, on castings/forgings with a hard or scaly skin you want to get under, and in some very thin-wall or hard-material situations. Default to climb, reach for conventional with a reason.
Rigidity beats horsepower for finish. This is the one we'd tattoo on a new programmer. Surface finish, tolerance, and tool life are dominated by rigidity — short tool stickout, solid work-holding, a part that isn't a diving board, a machine that isn't flexing. A small rigid setup will out-finish a big floppy one every time. If a tool is chattering, the first questions are almost never "more power?" — they're "can I get the tool shorter, hold the part better, or reduce the unsupported length?" Long reach tools and tall thin walls flex, and flex shows up as chatter marks, oversize stock, and broken tools.
The DFM mistakes we see most
Most of what makes a part expensive isn't the machinist — it's decisions made in CAD before the file ever reaches us. These are the recurring ones, and why each one costs money on the floor.
- Sharp internal corners. An end mill is round, so it physically cannot cut a sharp internal corner — there's always a radius equal to the tool radius. Demanding a true sharp internal corner forces a smaller tool (slower, more passes, more deflection), EDM, or a secondary operation. Design internal corners with a radius slightly larger than a standard tool radius (so we can use a reasonable tool and not bottom it out in the corner). This single change saves more money than almost anything else.
- Pockets too deep for the tool. Tools can only reach so far before they get long, thin, and floppy. A deep, narrow pocket means a long-reach tool with lots of stickout, which means deflection, chatter, poor finish, and slow cutting to keep it alive. The usual guidance is to keep pocket depth within a few times the tool diameter where possible. If you truly need deep features, give them as much width (and corner radius) as the design allows so we can use a fatter, stiffer tool.
- Tight tolerances on features that don't need them. Every tight tolerance costs money — slower cuts, more inspection, more scrap, sometimes a grind or a second op. A blanket ±0.001" on every dimension when only one bore actually needs it can multiply the price of a part. Tolerance only what mates, seals, or aligns; leave everything else at a sane general tolerance. This is the cheapest cost lever a designer has.
- Thin walls that chatter. Thin walls and tall thin ribs flex under cutting force. They vibrate (chatter), come out wavy or oversize, and force us to slow way down and take tiny passes. There's no universal minimum, but very thin walls relative to their height are trouble — give walls enough thickness, or enough support, to stay rigid while we machine them.
- Threads tapped too deep. Threads only need to be a little over one diameter deep to reach near-full strength; tapping much deeper than that adds time, risks tap breakage in a blind hole, and buys you nothing structurally. Call out a sensible thread depth (commonly ~1.5× diameter for steel, a bit more for soft materials) rather than "tap to the bottom."
- No flat or datum for work-holding and probing. A part needs somewhere flat and solid to be clamped, located, and probed. All-organic, all-curved, or fully draft-angled geometry with no flat reference is a fixturing nightmare — it adds soft jaws, custom fixtures, or extra setups, all of which cost money. A simple flat boss or face for work-holding and probe pickup makes the whole job cheaper and more repeatable.
- Knife-edges and feather-thin features. Where two surfaces meet at a near-zero angle you get a fragile knife-edge that burrs badly, chips, deflects, and is a safety/handling hazard. They rarely serve a real function. Break them with a small flat, chamfer, or radius.
Finishing and tolerance lessons
The part isn't done when it leaves the machine, and finishing is where a lot of "why is it out of tolerance?" calls come from. A few realities worth designing around:
- Anodize and plating add thickness — account for it on tight fits. Anodizing isn't just color; it grows an oxide layer, and a meaningful share of it grows outward, so dimensions get larger and bores get smaller after the process. Plating adds material too. Type II anodize adds a small amount; hard anodize (Type III) adds noticeably more. If a pin, bore, or sliding fit has a tight tolerance, you must either account for the coating buildup in the machined size or mask the critical feature. Plenty of "out of tolerance after anodizing" parts were actually in tolerance as machined — the coating ate the clearance.
- Passivation is not a coating. Passivating stainless removes free iron and enriches the chromium oxide layer to restore corrosion resistance — it adds essentially no thickness and doesn't change the look much. Don't confuse it with a plating or expect it to fill, color, or build up a surface. It's chemistry on the existing surface, not a layer on top.
- Deburring takes real, human time. Machined parts come off with burrs and sharp edges, and removing them — especially on complex parts with lots of intersecting features and cross-holes — is labor that doesn't show up in a toolpath. "Break all edges" is reasonable and cheap; calling out tightly controlled, inspected edge breaks everywhere, or expecting hand-polished perfection on a functional bracket, adds cost most of the budget never planned for.
- "Mirror finish everywhere" wastes money. Surface finish costs money, and a fine finish on a surface nobody sees or touches is pure waste. Specify the better finish only where it matters — sealing faces, sliding/mating surfaces, cosmetic show faces — and leave the rest at a normal as-machined finish. A blanket cosmetic spec on an internal structural part is one of the easiest places to quietly burn budget.
How we'd approach it
A few honest defaults from our side of the table:
CNC isn't always the answer. Machining is unbeatable for precision, low-to-mid volumes, prototypes, metals that need real tolerances, and parts where you can't justify tooling. But if you're making thousands of a plastic part, injection molding wins on per-piece cost once you absorb the tooling. Lots of identical thin metal parts? Sheet metal (laser/punch/bend) is often cheaper than carving them from solid. Big simple shapes, or features deep in a part a tool can't reach? Casting, extrusion, or EDM may be the right tool. The smartest move is matching the process to the volume and geometry, not forcing everything through a mill.
Design for cost from the start. The cheapest part is one designed with manufacturing in mind: radius your internal corners, loosen the tolerances that don't matter, keep walls and pockets sane, give it a flat to hold and probe, and account for finishing thickness. These choices are nearly free at the CAD stage and brutally expensive to fix after the quote.
Call an engineer early, not late. If a part is critical, expensive, or you're unsure whether your design is manufacturable, ask before you finalize and order. A five-minute DFM conversation up front routinely cuts cost and lead time and prevents the kind of scrap that ruins a schedule. We'd rather flag a sharp corner or a coating problem on the model than explain a rejected lot of parts later.
Frequently asked questions
What's the cheapest way to reduce CNC machining cost?
Loosen the tolerances that don't actually need to be tight. Every tight tolerance and fine finish you call out adds machining time, inspection, and scrap risk — and most parts only have a handful of features that truly need precision. Tolerance only what mates, seals, or aligns, and leave the rest at a general tolerance. After that: add radii to internal corners so we can use bigger, faster tools; avoid unnecessarily deep pockets and thin walls; and give the part a flat surface to hold and probe. These are free changes in CAD that have an outsized effect on price.
Why did my part come back out of tolerance after anodizing?
Almost always because anodizing adds thickness and nobody accounted for it. Anodize grows an oxide layer, and part of it grows outward — so outside dimensions get larger and holes/bores get smaller after the process. Hard anodize (Type III) adds significantly more than standard Type II. If a feature has a tight fit, you either machine it to allow for the coating buildup or mask that feature so it isn't coated. The part was likely in tolerance as machined; the coating consumed the clearance. The same logic applies to plating.
Is climb or conventional milling better?
On a modern, rigid CNC machine, climb milling is the usual default — the chip starts thick and thins to zero, which puts less heat into the part, gives a better finish, and extends tool life. Conventional milling still has its uses: on older machines with backlash, when cutting through the hard scaly skin of a casting or forging, and in some thin-wall or hard-material situations. So: default to climb, switch to conventional when you have a specific reason.
Why does feeding faster sometimes make tools last longer, not shorter?
Because a tool that's fed too lightly rubs instead of cuts. Rubbing generates heat without removing much material, which glazes the edge, builds up material on it (especially in aluminum), and work-hardens materials like stainless — all of which kill the tool fast. Feeding at the correct chip load lets each flute take a real bite, carry heat away in the chip, and cut cleanly. Within reason, a properly fed sharp tool outlasts a "babied" one. This is also why light finishing passes need chip-thinning compensation: when radial engagement is small, you have to feed faster to keep the actual chip thick enough to cut rather than rub.
How do I keep a machinist from charging me for a "sharp" internal corner I can't get?
Design the corner with a radius. An end mill is round and physically cannot produce a sharp internal corner — there's always a radius equal to the tool radius. Asking for a true sharp corner forces a tiny tool (slow, lots of passes, deflection), EDM, or a secondary operation, all of which cost money. If you add an internal corner radius slightly larger than a common tool radius, we can use a reasonable, rigid tool and cut it quickly. If the corner truly must be sharp for assembly clearance, a small relief cut (dog-bone or undercut) in the corner is usually cheaper than demanding a sharp corner outright.